Repelling and preparing for ice climbing

Yesterday we did outdoor climbing at a mountain called Garberg. It’s located about 20 km east from Älvdalen. There we got to learn more about climbing, or actually how to do repelling (meaning using a rope to get your self down a cliff). We also learned about the equipment you’ll need, for example rope (dynamic and static), how to check that the rope is in good quality, how to attach the rope in the right way – using three security spots and carbines etc.

IMG_7982

Our teacher showing us how to attach the rope on three spots. Safety always comes first!

IMG_8009

Carbines and some more carbines. Those can easily broke if you drop them towards hard material (ex. the floor). Then you have to throw them because there can be hidden cracks in them which will reduce their strenght.

IMG_8042

Focused and leaning back is the key. Also always to have the security/repelling hand static to your hip and not drop the rope. You adjust the speed and resistance with this hand. For me it’s the right hand.

IMG_8006

My class mate is about to ”climb down”.

IMG_8031

It was a cold day and then a fire and coffee is always welcome.

Over and out!

Dancing on water in the Norwegian mountains

This week we’ve been out in the mountains hiking, wading, climbing and sun-bathing. We’ve been very lucky with the weather meaning sun almost every day and the lakes have been clear as a mirror. In the mornings a thin layer of ice has covered the lakes and if I would have taken a few moves on the ice it would have felt like dancing on water. But… those who know me also knows that I wouldn’t risk falling into that freezing cold water 😉

IMG_7649

Ready, set, go! ”Hiking in autumn” here we come.

Hiking in different terrain

On the pictures you can see all the different terrain we’ve been hiking us through. The most challenging hike was when we climbed from the north-east side up on Mitretoppen, Rendalssølen 1755 m. This is the second time in two weeks I’m up on this top, but this time I climbed it from a different angle – and also through some snowy and slippery parts.

OLYMPUS DIGITAL CAMERA

Crossing water by wading. It was really cold. Here I’m not dancing – but very focused so I won’t fall and also get my backpack all wet.

OLYMPUS DIGITAL CAMERA

Wet wet wet…

IMG_7711

On our way towards Mitretoppen.

IMG_7749

Climbing on rocks, from the north-east side, with Mitretoppen 1755 m. as our goal.

Orientation in the night

The most exciting and nervous thing on this tour was yesterday. We had a night activity and the mission was to get back to the cars (the location for the cars was pointed out on the map). And we had to do this at night with just a head torch, compass and a map – and all by my self! For me this was a real challenge because I’m not very comfortable being out in the mountains in darkness, all alone and just navigating with a compass and a map. Anyway… It took med 2,5 hours to get to basecamp and the total distance ended up in 9 km. I felt very lucky when I reached the goal and proud that I had won over my fear.

IMG_7822

Some relaxing and preparation time before the night orientation will start.

IMG_7838

Still a little time until it gets dark. What doesn’t kills you makes you stronger.

More pictures from our week in Rendalssølen, Norway.

IMG_7657

Open up your mind and you’ll see the shape of a heart.

IMG_7667

The mountains reflected in the water.

IMG_7689

Just stunning! Sølentopparna and a crystal clear lake makes a perfect couple.

IMG_7692

Mountain-selfie!

IMG_7734

Lunch-time. Egg, noodles with bacon flavoured with curry. One of the easiest meals to make. And outdoors everything taste so much better.

IMG_7720

My class mates.

IMG_7752

Me and Ida up on Mitretoppen, 1755 m. We did it!

OLYMPUS DIGITAL CAMERA

My awesome class – all together up on the top!

IMG_7804

Waking up to this beautiful sunrise makes the whole day!

IMG_7815

We changed camping spot every day and got to see a sunrise almost every morning.

IMG_7841

Back in Älvdalen we stopped for a big breakie at the hotel. Thank you for a wonderful week with YH-fjäll 15/16.

Hiking and being out in the mountains when it’s autumn is the best time of the year. If you’ve never tried it just give it a go. The nature fills you with new and positive energy. If you feel unsure how to do just start with an easy daywalk – you don’t have to stay over night to be out in the mountains. Or join experienced friends or go on a guided tour. The tours usually have the equipment you’ll need (to borrow or for rent) and know how to act/about safety when you’re out in the wilderness.

Linnea

A peaceful hike up on Svarthamra

Svarthamra is a mountain on the Norwegian side. It takes about 15-20 min drive from Grövelsjön to get to the access where the hike starts. Here you have many alternatives for your route which makes it easy to decide how long distance and time you want to be out hiking. We decided to do an easy day walk with a long fika-break.

”Fika” is a typical swedish word meaning you’re having a nice time together with friends drinking coffee or tea, eating cake, sandwich, nuts and etc. to refill your body with.

On the way to Svarthamra you’ll pass small brooks, fascinating trees and if you decide to do the hike at this time of the year, you will get amazed by all the red and yellow color in the mountains. You’ll also see the large lake called Femunden and get a beautiful view of another fascinating mountain called Båthusberget.

About the track
 
Total inclination from where the hike starts and up to the top is 300 m. The track is nice – but at some places you’ll find it more rocky and can also be slippery. Estimated time with return is 6 h.
Linnea
IMG_7264

A feeling of freedom with an amazing view over the mountains and colorful environment. Photo: Niclas Bentzer.

IMG_7241

Red, yellow, green and many more colors – this time of the years is my favorite to be out hiking. And NO mosquitos. Photo: Niclas Bentzer.

IMG_7230

The mountain on the other side is called Båthusberget. I’ve earlier written a post on the blog about a tour I did up there.

IMG_7158

More fascinating colors and vegetation.

IMG_7207

To be out in the mountains, running and feeling free like a bird should be a privilege for every dog. Also a long fika-break is nice to relax and enjoy the outdoor life.

IMG_7184

You’ll see some really awesome cliff formation on this hike.

If outdoor life is in your interest – first aid should also be that!

This quote is from the education programI’ve recently finished and is an excellent saying of how outdoor people should think. The course I’ve taken is called Wilderness Advanced First Aid, WAFA. The school, which goes under the name NOLS and stands for National Outdoor Leadership School, is located in USA and was founded 50 years ago. Me and my class were very lucky to get this opportunity to study this course – and also to have two inspiring teachers learning us how to take care of injured people. The course lasted for five days with hours in school from 8 am to 5 pm, and also night shifts on wednesday and thursday. On thursday we got to have scenarios with highschool students acting injured patients.

You never know what will happen in the wilderness

When you’re out in the ”wilderness” you never know what will happen. Many things you need to figure out by your self and how to act in the best way considering what access to help you have and materials. But there are some rules you always need to follow and the most important is to look after you self. If you get injured you won’t be able to help the other person.
If you get to a person in need you should always have this in mind;
L-ABCDE
L = Location: Is it safe for me to enter the area and the injured person? What could have happened – risk of back injury? Are there any blood and do I have glows to protect my hands? Are there any more people? Is this a situation where it’s a question about life or death?

There are some indicators to have in mind if the persons neck needs to be immobilized and if you suspect there could be a neck- or back injury you need to immobilize the head immediately.

A = Airways: You have to make sure the airways are clear.
B = Breathing: Is the patient breathing?
C = Circulation: Are the patient bleeding? Check the whole body. Does the patient have pulse?
D = Decision: Should you continue immobilize the patients neck or have you gotten enough information to release the head?
E = Evaluation: Here you start to have a look at the patients most important complaint and do a full body examination. Palpation, strenght/movement in feet and hands, looking for liquid from ears and so on. You also need to check vital parameters such as pulse, awareness, the skin temperature/color and breathing. Also questions about the situation, medical history, allergies, medication, how the patient has been eating/drinking and so on.
A few example from what we learned about in the course
  • Burning injury

    The skin can be injured on different levels. Outdoor people usually burn their hands and feet because of sitting down when cooking their food in the outdoor kitchens. If the skin is injured you need to cool it down with lukewarm water at least 15 min to get deep down in the tissue. Remove rings and watches. All full-skin-injuries (all the way down to muscle tissue, skeleton and fat tissue) should be evacuated. Also if you’ve injured your face, neck, hands, feet, armpits and growings.

  • Blisters

    You can get blisters from friction, burning injuries and frostbites. One rule is to not puncture a blister because of the infection risk, but if you need to continue walking in your boots you’ll probably need to drain, wash and put tape (for example blistoban) on the blister. When you drain the blister the needle needs to be sterilized! The best way to avoid blisters is to check your feet regularly and if you get the smallest sense that your skin is getting warmer on a certain spot – take off your boots and cover with tape or something that takes away the friction.

  • Hypothermia

    This condition can be very serious and can go very fast. Hypothermia means that your body decreases in temperature and below 35 degrees you are in a mild stage of hypothermia. You’re shivering, your pulse increases to give more blood to your body, you can get frustrated and angry. Here you need to get your self activated/in movement, dry and more clothes, water and food.

    Moderate hypothermia means you’ve reach another state of temperature drop in your body. Your body is now shivering without control and your state of mind is on a low level. You’re pale and passive. You’ll need the same treatment as on the ”mild stage” and also get in a ”warm package” – for example wrapped in warm clothes in a sled.

    Serious hypothermia means you’re unconscious, no shivering, your heart is weak and you’ll probably need help with your breathing. This person have to be wrapped in warm clothes and in a ”warm-package” and evacuated immediately.

Other medical conditions, injuries and treatment
 
Some other conditions/injuries/treatments we’ve learned about are:
CPR, altitude sickness, infections, muscle/skeleton injuries, amputations, medical chock, head injuries, back injuries, how to build a litter, pneumothorax, how to take care of wounds and also wounds caused by external material (for example a stick), how to act in thunderstorms, drowning accidents and much more.
This week with the WAFA-course feels like a perfect complement to my physiotherapist education. With all my knowledges I hope to act in the right and best way I can to help people in need. But remember always to be a step ahead and prepare yourself for the activity you’re about to tackle.
Linnea
IMG_7464

A perfect saying for outdoor people!

IMG_7508

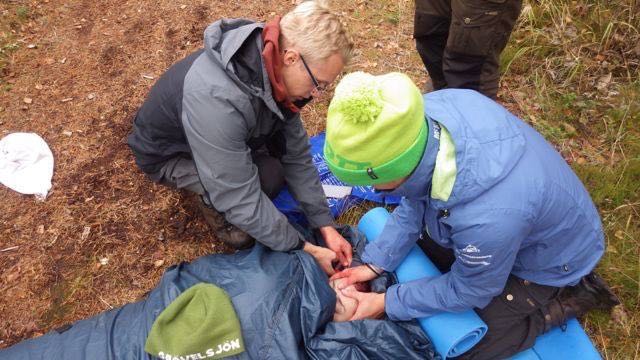
Immobilizing the head. Here we’ve rescued a person laying in cold water.

IMG_7378

Wrapping a wound with a stick in the back.

IMG_7354

Organizing our selfs before we start to carry the patient.

IMG_7495

My amazing class mates, two teachers and Benjamin after graduating from the course.

IMG_7492

Proud to have completed the course and get the diploma!

Defeat every obstacle

Ahead of the 40th and the last obstacle we stopped for a few seconds. We formed a circle, gave each other a big hug, said a few encouraging words, roared loudly and then gave full attention on the black giant ramp that we would run up on.

Team Katrinebergs PT, consisting of the prospective personal trainers Toste Danielsson, Adde Hammarberg, Oscar Detmer and I, Erika Nilsson Waara, were now ready to accept the challenge and defeat everything that came in our way. This is about Toughest and about being tough, brave and bringing out the stubborn bull in you.

Toughest is a competition on tour, this time in Gothenburg with about 2500 participants, which means that you run a distance of eight kilometers, while you’ll pass 40 different obstacles along the way. It is about obstacles such as climbing, using your arms and legs in various forms, crawling, tires rolling, carrying sacks and trees, balance obstacles, jumping, rolling and much more than that. Our start time was set at noon 2:40 and one of today’s finest moments was the reunion with my sister Linnea. We started at the exact same time as her team, aventyrsledarna.se, from Älvdalen. That we for once were in different teams didn’t actually really matter, as we urged, supported and helped each other on some obstacles. It was a very happy reunion, because it was about two months ago since we saw each other. In other words, there was room for a lot of love in all of the competition hysteria.

So how did it go with the final obstacle? Our bodies were now covered in smelly mud up to the stomach area. The shoes and gloves were totally soaked. The number tags had fallen off. Face and hair appeared to have had significant sand and mud pack. Not a dry or clean stain could be seen on the body. Suddenly thoughts flew off to the film The Fantastic Four. The crowd around us cheered intensely. The music pounded in rhythm of techno. We lined up and made us ready for the next battle. The stage is ours! Thirty-nine obstacles we’re completed. One remained. One by one we took off. We gave everything we had in the run-up and completely flew up the ramp. The adrenaline was pumping wildly and joy completely spread throughout our bodies. The Fantastic Four was standing on top and just roared straight out! We had conquered every obstacle. We had done it together, as a team, methodically and with toughness, passion and joy. All of us had grown a bit inside and no doubt we would all do it again!

Linnea and Erika before the run

Linnea and Erika are looking forward to the race.


Toughest in Gothenburg

Toughest in Gothenburg


The rings were one of the obstacles

The rings was one of the obstacles


IMG_7590

Dirty and so much fun.


IMG_7585

Carrying heavy containers.


DSC03738

The final obstacle; the ramp!


IMG_7608

Victory! Together and completed the race Toughest 2015!


The Fantastic four aka Erika, Detmer, Toste and Adde have completed the run with a roar!

The Fantastic four aka Erika, Detmer, Toste and Adde have completed the run with a roar!


Katrinebergs PT are true heroes!

Katrinebergs PT are true heroes!


IMG_7623

At aventyrsledarna.se you can have a look and see what Linnea is up to at her school.


IMG_7601

Linnea and her class mates from Älvdalens utbildningscentrum. Äventyrsledarna (adventure and mountain leaders).


IMG_7616

No kidding – Linnea needs a bath!


And the medal in my hand

And the medal in my hand


Eating together after the race

A nice dinner and celebration after the race

So what’s your next obstacle to defeat?

Cheers!

/Erika

The top of the Queen

This weekend I’ve been up in the mountains in Grövelsjön and its surroundings. The autumn has shown it self from its most beautiful side, with all the yellow and red colors and also a sun that is still warming. In Rendalens community you can find a dramatical mountain with three tops which together goes under the nickname ”The Queen”. The real name is Rendalssølen and the highest top is called Store Sølen, 1755 m. But it’s not just the top that makes it worth going there. The track all the way to the valley, the crystal clear lakes and the massive mountains give that little extra to get the perfect cinnamon bun. From Grövelsjön it takes about 1 h and 15 minutes drive. And from where the hike starts it took us 4 h and 20 minutes with return, total distance 24,5 kilometers. Note that we did jogging, a bit of walking and also took a 30 min stop on the top for a lunch break. Before continuing the last 500 height meters to the top you should refill your bottle with water (down in the Valley).

IMG_7111

Rendalssølen from a distance. The highest point, which looks like a shark fen, called Store Sølen (1755 meters above sea level), is where we went up.

IMG_7037

On the ”road” again. High on mountain life.

IMG_7078

Taking the opportunity to refill the water tank.

IMG_7102

The Valley, up on 1200 m.

IMG_7063

My friend is looking out over Norway with its spectacular view.

IMG_7245

It’s quite steep on the top. But with an incredible view.

IMG_7242

Go, go, go. And in between, remember to slow down, breath and enjoy the mountains.

IMG_7104

The track and environment invites to jogging.

IMG_7250

Thank you Rendalssølen for my first visit to you.

Linnea

A 360 degree view over the Norwegian mountains

Båthusberget is a spectacular mountain located in Norway. From Grövelsjön (which is located close to the Norwegian border) you can take the car to where the track starts, it’s about 15-20 min drive. The total hike is nine km and takes you up on Båthusberget. It’s considered as one of Grövelsjöfjällens most beautiful hikes. Some parts are quite steep and raises your pulse. At one point of the track you can choose to walk right- och left lap. If you choose right lap the track will be more steep uphill to the summit and downhill the inclination will be less steep. This lap is recommended because it’s easier to take the steepest part walking uphill. Along the track you can refill your bottles from the streaming water. The vegetation offers different kind of old and impressive trees, flowers, lakes and a beautiful 360 degree view over the Norwegian mountains. Total inclination in meter is 500.

IMG_6819

Walking the right lap with another mountain in our background, called Herbenser.

IMG_6705

Starting the track and walking in the forrest.

IMG_6730

Life as a guide.

IMG_6723

Good company makes the trip something little extra.

IMG_6734

Both people and dogs were on this guided tour.

IMG_6776

Some parts are more steep. You need to stay focused and look where you put your feet.

IMG_6779

Båthusberget from below.

IMG_6823

A pleasant tour with an amazing group and beautiful weather.

What kind of sleeping bag do I need?

Go camping or hiking and stay in tent over the night means that you’ll need a sleeping bag. But there are many different kinds of sleeping bags… This post can hopefully give you an idea of what and how to choose which one is right for your needs.

Start your research with these questions:

1. During what time of the year do you intend to use your sleeping bag?
Is it mainly during summer time or when it’s colder outside? There are different kind of sleeping bags which go under the cathegory; 1-4 seasons. A four-season bag means that the bag is aimed to be used the whole year around. A three-season means you can have it spring, summer and autumn. This bag is the most allround (if you sometimes will go out in the winter and don’t have a proper winter bag you can use two sleeping bags and get the warm degrees you need). Remember to look at the comfort temperature to make sure they will reach up to the temperatur you’ll need.

2. Are you like me, meaning a person who often is cold or who easily gets warm?
A sleeping bag for summer should have a comfort to -5C and a winter bag to -25C. Remember that women need a higher temperature then men. Always look at the comfort for your gender. To increase your temperature you can have a sleeping bag liner (made of cotton, or even better – silk) and use it inside your sleeping bag). The liner also keeps your bag last longer.

3. What kind of material should your sleeping bag be made of?
Down or synthetic material or a combination? Down is lighter and keeps you warmer, but are more expensive. The material gives you most isolation in correlation to its weight and volume. The quality of the down is classified according to its fill-power (cuin), meaning how ”fluffy” it is. The finer the down is the more isolation it gives. A filling of 400–450 cuin means average quality, 500–550 cuin is considered good, 550–750 cuin is considered very good och 750+ is excellent. Before you buy a sleeping bag made of down, make sure it follows ethical rules. Synthetic bags are a bit heavier, but if it gets wet it dryes faster. They are usually cheaper. Mainly used in the summer/warmer weather conditions. The ”foot” of the bag should have the shape of an elephants foot rather than a fish-tale; which keeps you warmer.

4. How to ”behave” in your sleeping bag?
When you move around in your bag the warm air goes out. The new air that comes in then needs to be warmed up again.

Other tips:
When you arrive to the place and set your camp you shall straight away unfold your sleeping bag (especially if it’s made of down). When you come back home you should hang it up and let it dry for a few days. Never let it stay in your compression bag; instead use a big ”net-bag” or let it hang on a rack (just make sure it doesn’t become small scratches or marks because of frequent pressure against the same point).

Hopefully you’ve got some more ideas before you make your decision what kind of sleeping bad you’ll buy. Also talk with the staff in the outdoor stores, they should know about their products and guide you in the sleeping bag jungle.

Linnea

IMG_6100

A warm and cozy sleeping bag is a real luxury and a safety when sleeping in tent. A good sleep makes you happier and your body and mind works better.

Light is right!

Going hiking usually means a lot of luggage and outdoor equipment. There are many questions to answer before you start to pack your bag, for example:

  1. how long time you’ll be away?
  2. what will the weather be like (will it rain, be very cold…)?
  3. will you stay in huts or are you camping outside?
  4. what previous knowledges and experiences do you and your friends have from outdoor life and how challenging will this trip be?
  5. Any medical aspects/physical difficulties to have in mind?

Shelter, sleep and carry

One rule is to carry light and only bring stuff you really need. A maximum of 3 kilos for shelter (tent), sleep (sleeping bag and mattress) and carry (backpack) are recommended. If you’re planning to set a basecamp and do day trips, a smaller backpack is unbeatable. With my personal equipment this ”3-kilo-rule” is very limited for me, but gives me an idea how I should think when I need to/consider to update my outdoor equipment. Every extra piece of gram you add on to your luggage means extra kilos on your feet, knee and so on.

IMG_5340

Your luggage with tent, backpack and sleeping equipment shouldn’t weigh more than 3 kilos in total.

IMG_6270

A comfortable and hard wearing backpack that doesn’t way to much are preferred.

”Going hiking is like preparing for a longterm backpacker trip. You need to consider every piece of luggage, meaning what to bring and what to leave at home. But remember to always have safety in mind as rule number one”.

Linnea Nilsson-Waara